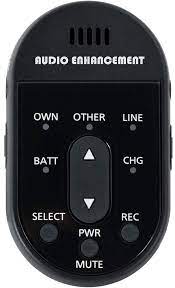
Updates Happen!
.
  • Blog
  • Home
  • About
  • TIPS
  • LanSchool
  • Run Updates
  • Teacher Laptop
  • PTC set up
  • Lockdown form instructions

Techie Tuesday #2

10/26/2021

0 Comments


What do <list below> have in common?

  • Find a grave
  • Data.gov
  • The Library of Congress (LOC)
  • The FBI
  • FOIA (freedom of information act)
  • Fed Flix (National Archives movie index)
  • NSA
  • MIT Visualizing History
  • The Morgue files
  • Primary Sources
None of the them are “indexed” or searched deeply by Google!  Which means students may never see these websites unless they get direct links and reason to go there.  Those links and many more can be found on the search engines of TheOlyCenter.org website.  If one of those links perked your interest – go to the search engine page to find the link!  There are a few hundred more of them broken down by discipline for you and your topic.  If you have any topics or links to add please don’t be shy – I would be happy to add them or build you a list.

theolycenter.org/search-engines.html

Update your slideshow

​To change your “Weekly Checklist” (slideshow) in Canvas… 
1. Go to your Google Drive and find the presentation Tiffany has sent you.  Edit it as needed then…
  • Go to File
  • Publish to web
  • Embed
  • Copy the code
  2. Go to Canvas
  • Find the page you want it on
  • Edit
  • At bottom click the </> code button under the current slideshow.
  • *Delete the code that is there and paste the new code.*
  • Click the </> button and you should see the new slideshow.  You can keep editing the page as normal.
  • Scroll Down to click SAVE.
 
*IF YOU have more content on your home page… BE SURE to only replace the <iFrame> code
 
Pro Tip!
If you have MORE than the slide show on you page…. In edit mode hit return a few times (BEFORE the slide show) to separate the content a little bit.  THEN go to code mode </> 

0 Comments

Embedding Slideshow

8/13/2021

0 Comments

 
Below is a video on how to embed a slide show in a Canvas page.
0 Comments

Cross-listing and Importing content to Canvas classes

8/12/2021

0 Comments

 
Think of cross-listing as combing like classes!  Be sure to combine the correct classes!  You cannot undo this.
 It is very important to.
Import from the correct class!  Remove due dates!
(If you do not remove them you will be deleting each item individually)
A file with just the steps as a refresher! --->
Crosslist your classes first.
crosslist_and_import.pdf
File Size: 252 kb
File Type: pdf
Download File

0 Comments

Adding People to Canvas

10/27/2020

0 Comments

 
Howdy hey!
I get quite a few teachers asking me to add another person or teacher to their Canvas class.  You (the teacher) can also do this in your own classes.
  1. Click on "People"
  2. Click the blue "+People" button
  3. Add their "e-mail address"
  4. be sure to give the correct "Role"
Then click next.

Please understand that if you give someone "Teacher"  rights they have the same rights as you!
Picture
0 Comments

Canvas new QUARTER

10/23/2020

0 Comments

 
Two quick things for the start of  a new quarter.

  1. How to NOT see last quarter's assignments.  Easy, peasy!  Go your Canvas Assignments tab.  At the top there is a dropdown menu that says "Grading Period".  Chose grading period 2.  Viola!  If you need to see an assignment from a previous grading period just change it back.
  2. Do not cross-list your classes at a quarter break.  You will lose your data that is currently in your class.  Cross-listing (properly) must be done at the start of a class, or semester.

What about Modules?   

Q. Can we “hide” or not show the modules? 
A. Not like you can Assignments, but…
 
There are ways!
  1. It should not matter.  Modules should be by date so just keep adding more modules at the top.  Old modules will be still be there at the bottom and not used.
  2. If you really do not want them there… Unpublish them.  BUT then the kids can’t see them.  You will still see them.  Theoretically and Chronologically you should be done with them.
0 Comments

Adobe Acrobat forms

10/21/2020

1 Comment

 
Caveat - Acrobat is a very powerful and there are other ways to create a form!  I believe this to be the simplest way as teachers already have numerous documents / worksheets already created.

First of all - Why


​Students cannot edit your form.  They fill in the text boxes you "create".  It can be best described as a digital worksheet.  Why not just give students the Word or Google Document then?  Watch the video to compare a student filling in a Word document vs. Filling in a pdf form.

Download Acrobat Pro DC


​You will need Acrobat Pro to create a form.  You have access to it with your @graniteschools.org account by logging in to Adobe Creative Cloud.  It is simple but may ask you to log in the first time and run some updates.

How to create an easy table


​You more than likely have some "worksheets" already made in Word or Google.  Don't re-create anything.  However it is best if  you have "answer spots" for your students to write their answers in.  Those become the fillable fields in the form.

As the user


​Open the .pdf as any file. 
Fill it out.
Save it
​Send it.

A little more complex...

How I created the first form (worksheet) above in the first video.

Quick short summary
  1. Download Adobe Acrobat DC
  2. Create or open document with answer spots.
  3. Save it as pdf.
  4. Open it in Acrobat DC
  5. Use the tools on the right and click on "Prepare form"
  6. Yes you want to use the current document.
  7. All your "Answer lines" should turn in to fillable boxes or lines.
  8. Save it!
  9. Send it to students via Canvas / Google.
Students:
  1. Open the file you give them via Google or Canvas.
  2. Fill out the form
  3. Save it as any file. Perhaps have them type their name in the title too.
  4. Turn in via file upload as we do in Canvas.
1 Comment

Communicate!

4/24/2020

0 Comments

 
Three Great WAYS!
  1. In Canvas go to Grades. At the top near the Assignment title click the 3 dots and chose... "Message students who..."
    Pros - perfect for specific/individual assignments!
    Cons - does not send to parents

  2. In Grade book 
    Go to your class.  Top left click the e-mail icon.  Chose recipients Include Progress reports, attendance...) Pros - can include a progress report, include "parents"
    Cons - No record of it as it comes from grade book

  3. In Grade book 
    Go to Reports, chose GSD Preferred Student e-mail
    Three options of student e-mails "preferred", GSD, Google e-mail address in pdf or xls formats
    Pro - Clicking on the @email.com opens YOUR e-mail program to send.  There will be a record of it.
    Cons - It's another file for you to keep somewhere.  Do not add them to your contacts - there's too many!


All three of these methods have video instructions here!  The page is password protected as I don't have time to edit out student data.  Teachers may ask me for the password.
0 Comments

Canvas Notifications

4/21/2020

0 Comments

 
How to set your contacts (for notifications) in Canvas. By default it is set to your @graniteschools.org account.  YES, students have one of those too.  Log in to www.office.com to check it.  However add whatever e-mail want but make sure it is one you do check.  I HIGHLY suggest your @granitesd.org acct. since you log in to Google quite often.
My suggestions!
  • In the Notifications area Conversation = inbox = "e-mail" As in, check your inbox for a conversation.  Many users send conversations to their e-mail and then say student's have e-mailed them...
  • Do NOT send your Conversations to your e-mail. Just have the conversation in Canvas.  Skip the middle software!  Check your inbox, respond in your inbox.
  • Add a phone number too and get texts.
  • Get a text when there is Conversation and know to check your inbox!
  • You can decide what other notifications you want and where you want them sent.  You could chose to not be notified or not to check your e-mail but those are YOUR <bad> choices.
0 Comments

Canvas - Embed videos

4/17/2020

0 Comments

 
Videos should be embedded into canvas!  That "forces" the students to watch the video in your Canvas page.  If you just put a link to a video for students to click on... you just sent the kid the movie theater and expect them to come back!

1.  Find the embed code.

Picture
Picture
You may need to find the SHARE button.  On the left from a Library of Congress website it is under the video. At YouTube (2 pics below) it is a two step process.
  1. Click Share,
  2. THEN embed
  3. then copy the code.
Picture

2.  In Canvas....

Create your page or assignment, then click the video icon in the edit box and select embed.  Paste.  Click OK.  this will keep you students in "Class" and not wandering around the "theatre"... aka being sent to YouTube!
Picture
0 Comments

Video Chat Options

4/11/2020

0 Comments

 
These are in order of preference for Teacher - Student conversations

  1. Canvas "Inbox" not for live video or "Office Hours" but your first line of communication!  (I also recommended NOT forwarding student messages to your e-mail.  Keep Outlook e-mail for employee things and student stuff IN Canvas)
  2. Google Meet (Instructions are here or on their site)
    Teacher - Student / teacher - teacher
    Both teachers and students should already be logged in and know how to use their @granitesd.org accounts.  Go to the waffle find Meet.  Yes there is an app in your app store.
  3. MS Teams Chat (instructions from "them")
    Teacher - teacher / teacher - student / student - student
    Log in to www.office.com with your @graniteschools.org account. Find Teams.  (The Purple T tile.)  Use the Chat feature.  Students can log in with their 9#@graniteschools.org.  BUT most don't know that.  Yes, there is an app in your app store.
  4. Skype For Business (Link to support)
    Teacher - teacher (or Staff/Employees) on GSD Devices.  Does not work on Chromebooks.  YES, there is an app in your app store.  We have been using this for years.  But it is going away as we move to Teams
  5. Zoom
    ​Is not recommended as there are too many security risks.  Also we spend $$$ on the above options and we have been using them for years now anyway!

Good ideas from the Chariot Group.


15 Video Conferencing Personal Etiquette & Protocols
  • Wear work-appropriate clothing and be sure your work space is orderly
  • Frame the camera correctly and pay attention to what is behind you
  • Have the right light and be cognizant of back lighting and distracting glare
  • Be aware of outside noise and when possible, schedule meetings in a quiet space
  • Be courteous to other participants and don't carry on side conversations
  • Look directly at the camera, maintain eye contact, be present and stay seated
  • Speak clearly, don't shout and keep body movements minimal
  • Be aware of visual alignment with your camera positioned above your monitor  
  • Avoid distractions such as your phone and leave the keyboard alone
  • Don't interrupt other speakers and use the established meeting cues  
  • If other participant cameras are on, yours should be also
  • If you have signed in, use your first and last name, not a nickname or handle
  • Eat before or after a video conference call, not during
  • Remember that mics and cameras are live  
  • If you are interrupted by a call, child, etc., mute your audio and disable your camera while you’re dealing with the interruption. Return discretely to the video meeting without unnecessary explanation.  
 
10 Video Conferencing Etiquette Operational Protocols
  • Test your technology before the meeting to ensure it is working correctly
  • Start and end on time, virtual time is just as important as "real" time
  • Have an agenda and perhaps a time keeper
  • Have a moderator if you can to help people stay on track and engaged
  • Identify meeting cues such as raising hands, sharing documents, etc.
  • Briefly explain technology features available such chat pods, etc
  • Begin with a safety minute and/or housekeeping moment
  • Remind participants to mute their mics when not speaking 
0 Comments
<<Previous

    Categories

    All
    2021
    Adobe
    Arts & Culture
    Boxlight
    Bulletin
    Canvas
    Cheating
    Chrome
    Copyright
    Display
    Distance Learning
    Enhanced
    Flipped
    Google
    Granite
    IOS
    Laptop
    Maps
    Microsoft
    Nearpod
    New Computer
    Outlook
    PickAtime
    PTC
    Safari Montage
    Scan
    ScreenCastify
    Settings
    Software
    Troubleshooting
    Tuesday
    UEN
    Updates
    Video
    Weebly
    WelcomeBack2020
    Zoom

Powered by Create your own unique website with customizable templates.
Photo used under Creative Commons from focusonmore.com